 Your blood pressure is a very important piece of information to know. As the blood pumps through your body, it applies force to the walls of your arteries. This force is known as your blood pressure. Your doctor will likely check your blood pressure at every visit, but you can also have it checked in other places, such as fire stations, automated machines in drug stores, or clinics. You can also check it yourself at home.
What to Do Before Checking Your Blood Pressure
When you check your blood pressure at home, make sure that you do it correctly to avoid getting the wrong numbers. Fortunately, there are a few simple tips for how to check blood pressure at home.
Before you take the test, you should be at rest. This means no exercising for 30 minutes before the test is done. Avoid tobacco and caffeine for at least 30 minutes before the test as well. Sit in a comfortable chair with your feet on the floor, breathing slowly and deeply, for the five minutes right before the test. When you do take the readings, be ready to take two or three of them at once, only about a minute apart.
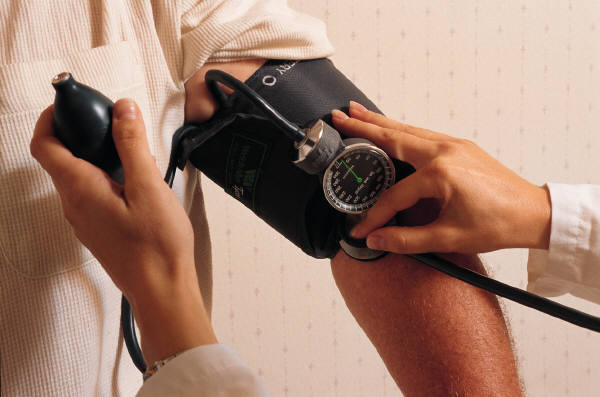
How to Check Blood Pressure at Home
Many people find that checking your blood pressure at home is much easier if you use a digital blood pressure monitor that inflates on its own. These monitors mean you simply sit back and relax while the machine does all the work– all you have to worry about is the proper placement of the cuff on your arm. But it is good to know how to take your blood pressure manually as well.
To take your blood pressure manually, you will need a blood pressure cuff that is the right size for you, and a stethoscope.
Step 1: Find Your Pulse
The best place to find your pulse is slightly to the inside center of the bend of your elbow. This is the brachial artery. Press your fingers there to feel the rhythmic pulse that moves through the artery. If you can’t feel it, try pressing the head of the stethoscope in the same spot – you will probably be able to hear it very clearly. Keep trying until you find it (it might take some practice).
Step 2: Fix the Cuff
The lower edge of the cuff should be about one inch above the bend of your elbow, and the cuff itself should be snug around your upper arm. Most cuffs are marked with an arrow that indicates where you should take the pulse; remember that this area is on the inside of your elbow. Once the cuff is affixed properly, put the stethoscope tubes into your ears so you can hear. Check for the pulse one more time.
Step 3: Inflate and Deflate the Cuff
- With a manual monitor
When using a manual monitor, hold the pressure gauge in your left hand and the inflation bulb in your right. Turn the screw clockwise to close the airflow valve. Squeeze the bulb to inflate the cuff; watch the gauge throughout the inflation. You should hear your pulse, but then it will slowly decrease and disappear altogether. Continue to inflate until you are about 30 points above what you expect the systolic pressure to be. At that point, stop pumping and slowly release the pressure by turning the valve counterclockwise. When you hear the first pulse beat, the number on the monitor is your systolic pressure. Keep listening until you can’t hear the pulse anymore, you have reached the diastolic pressure.
- With a digital monitor
The digital monitor is much the same as the manual monitor. You inflate the cuff, but a monitor does the reading for you, so you don’t have to listen carefully for the systolic and diastolic pressures. Just sit back and watch the monitor to get that information. There are some digital monitors that do the inflation for you as well, so you just have to do nothing other than touch a button.
Step 4: Write Down Your Blood Pressure
Keeping a good record of your blood pressure can help your doctor determine the best course of medications or activities for you. Remember to take at least two readings each time. Note which arm you used (try to use the same one each time) and take your blood pressure in the morning and at night. Write all of this down and take it to your doctor at the next visit.
Here are more details about how to check blood pressure at home:
Tips for Checking Blood Pressure
When checking your blood pressure at home, you have to keep the following tips in mind.
- Choose the suitable cuff
When checking blood pressure, the cuff you use matters a great deal. If you are heavily muscled or obese, you might need a larger cuff. Your local pharmacy, drugstore or department store likely has numerous types of cuffs available; look at the measurements on the box to determine whether your arm will fit comfortably in those cuffs. If you are very small, you might need a smaller adult cuff or even a pediatric cuff.
- How to get a accurate reading
When you do use the cuff, don’t flex your arm at all. Don’t place the cuff over clothing, as this might give you an improper reading. Before you take your blood pressure with a new cuff, check to see if the monitor requires calibration; this must be done in order to get an accurate reading.
It is important to remember that while your blood pressure checks at home are a very important part of your health record, they are not done by a professional. This is why you need to have your blood pressure checked by a certified emergency medical technician, or someone else who is qualified to take your blood pressure as a professional.This can help you avoid getting the wrong numbers and believing that everything is fine when you actually do need medical attention.